General Information
A LISTSERV Web Portal is available for Listserv owners to Manage their Listserv(s) and for Listserv subscribers to manage their list subscriptions. The Web Portal allows Listserv users to make changes without sending e-mail commands.
Open the Web Portal
Web Portal Links:
Select the link that corresponds with the ending of the Listserv list's e-mail address. (@listserv.lsu.edu or @lists.lsu.edu)
Off Campus Access:
You will need to use a VPN / Virtual Private Network for off campus access.
Login Credentials:
- If you DO have a myLSU ID, login with your LSU e-mail address & myLSU Password.
- If you DO NOT have a myLSU ID, login with the e-mail address associated with your Listserv subscription(s)/ownership and the user password for the list.
NOTE: Only list owners can make changes to list settings. However, list subscribers may also log into the Listserv web portals to view their list archives and edit their subscriptions and preferences.
- If you DO NOT have a user password and/or a myLSU ID, click the "get a new LISTSERV password" link on the Web Portal login screen.
Need More Help? When making changes using the portal, users may need additional information or clarification about settings. Users may click the "?" buttons located throughout the site for more information on certain sections and parameters.
NOTE: The following tasks may be completed ONLY by a list owner.
Change the List Settings
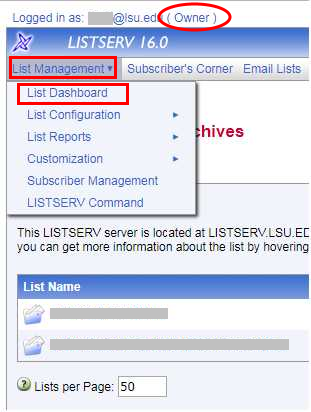
1. Click the List Management drop-down menu, and select List Dashboard. (List Settings include the list owners, senders, attachment settings, etc.)
2. This will bring up a list of ALL of the Listservs that you are an owner of.
NOTE: Make sure you have "( Owner )" next to your name. Otherwise, you are not listed as the owner in the Listserv application. If you are the owner (faculty/staff ONLY) and do not have this next to your name, please contact helpdesk@lsu.edu or call 578-3375.

Add Subscribers
1. Click View, located on the List Dashboard below the number of subscribers of the list you want to administer.

2. This will open the Subscriber Reports page.
3. Locate the Subscriber Management section.
4. In the Add Subscriber field, enter the user's e-mail address followed by their name in parentheses.

5. Click the Add Subscriber button. Repeat this process for each new subscriber.
6. Click the Submit button (located at both the top and bottom right-hand corners of the Subscribers box) when finished adding subscribers.
To add subscribers in bulk, please see GROK article #17532.
Remove Subscribers
1. Click View, located on the List Dashboard below the number of subscribers of the list you want to administer.

2. This will open the Subscriber Reports page.
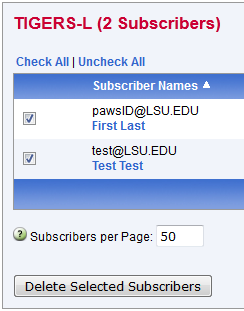
3. Locate the box toward the bottom of the page that says "[Listserv Name] (# Subscribers)."
4. Select the checkbox(es) next to the subscriber(s) to be removed.

5. Click the Delete Selected Subscribers button.
6. Click the Submit button (located at both the top and bottom right-hand corners of the Subscribers box) when finished removing subscribers.
To delete subscribers in bulk, please see GROK article #17532.
Add or Remove Listserv Owners, Moderators, & Editors
1. Click Configure, located on the List Dashboard below the List Name of the list you want to administer.
2. This will open the List Configuration page.

3. Select the List Maintenance tab.

4. Navigate to the section that you want to edit, either Editor, Moderator or Owner. The Quiet owners section can be found on this page under Owners.
*The name MUST be entered in parentheses. Example: (Mike Tiger)
5. Once ALL changes are complete, click the Save button at the bottom of the page.
Allow or Disallow the use of Attachments
1. Click Configure, located on the List Dashboard below the List Name of the list you want to administer.
2. This will open the List Configuration page.

3. Select the Access Control tab.

4. Navigate to the Attachments section.
5. Select the desired option (No, Yes, or All) from the drop-down menu. If allowing attachments, please note that the total attachment size limit is 3MB per message.
Important information about Listserv Attachments:
- Attachments are not turned on by default.
- Attachments should not exceed 3MB in size.
- If external content (Word Documents, Excel Spreadsheets, PDFs) need to accompany any listserv message, then that content should be shared via a link from FilestoGeaux, OneDrive, or Box.com.
- Should any submitted Listserv message negatively impact the Listserv application's performance, Information Technology Services reserves the right to delete the message to improve Listserv performance.
Optional Settings:
-
If only certain types of attachments should be allowed, select "Yes" from the drop-down & specify the file types in the Allowed Types field. (Example: "image" allows all image files, "application/*msword" allows all Word files, etc.)
-
To disallow certain attachment file types but still allow the text of these messages to be delivered, select the "Filter" checkbox. This will deliver the message without the disallowed attachment.

6. After you make all necessary changes, click the Save button located at the bottom of the page.
Add & Remove Senders
1. Click Configure, located on the List Dashboard below the List Name of the list you want to administer.
2. This will open the List Configuration page.

3. Select the Access Control tab.

4. Navigate to the Send section.
5. Select on of the security options from the drop-down list. Private, Owner or Editor.
"Private" includes all Listserv members, "Owner" allows only owners of the Listserv to send, "Editor" allows only editors of the Listserv to send, etc.
6. After you complete your changes, click the Save button located at the bottom of the page.
7. OPTIONAL: Adding a Sender when they are not a List Member:
a. Locate the "Special" field in the Send section.
b. To remove a user, delete their e-mail address and name from the field.
c. To add a user, enter the user's e-mail address and name on a new line in the field.
d. After you complete your changes, click the "Save" button located at the bottom of the page.
Referenced from: L-Soft